Sous Vide Chuck Roast and Gravy
on Oct 18, 2023, Updated Nov 21, 2023
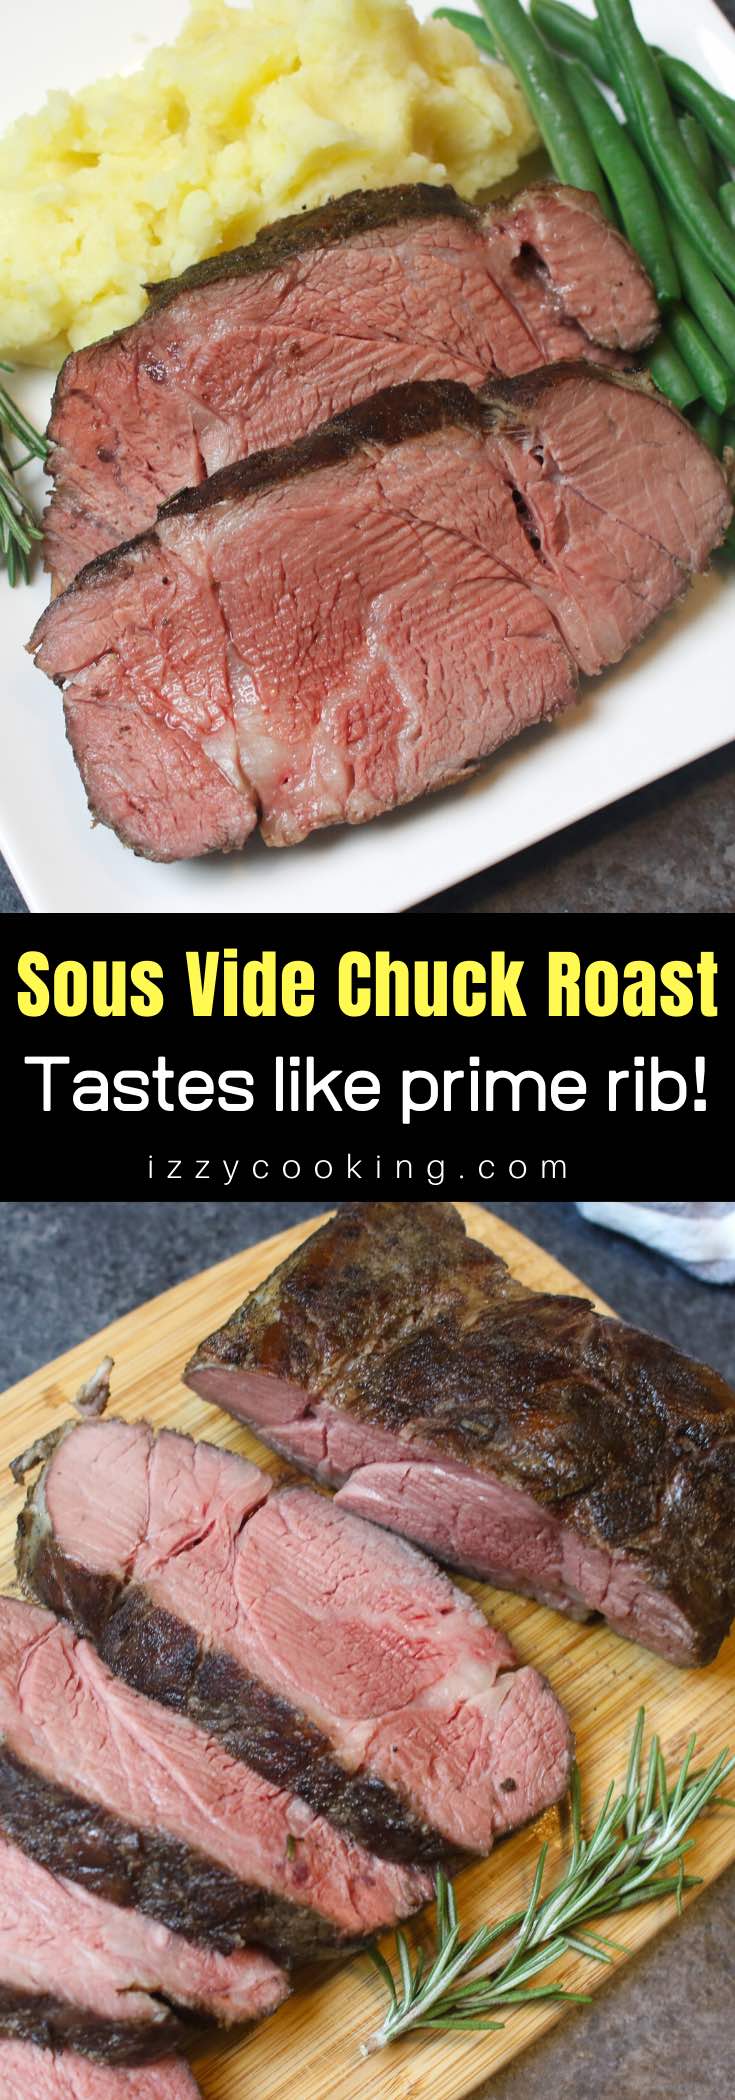
Sous Vide Chuck Roast is incredibly flavorful, tender, and juicy, unlike the pot roast cooked the traditional way. This 24-hour sous vide recipe transforms the cheap tough cut of a chuck roast into the most delicious beef roast that rivals the expensive prime rib. Oh my, it’s totally a game-changer!
Featured on Best Sous Vide Recipes
What is Sous Vide?
Sous vide means ‘under vacuum’ in French. It’s a cooking technique where foods are first vacuum-sealed in a bag, and then cooked for a long time to a precise temperature in a warm water bath. The food never cooks past the set temperature.
Why Sous Vide Chuck Roast Beef?
Sous vide cooking is the BEST way to make pot roast! When cooking tough cuts such as chuck roast or rump roast, the oven or slow cooker method braises the meat for a long time when the roast is completely well done. Sous vide allows you to cook these tough cuts evenly to rare or medium-rare with the precise temperate you set.
The best part? Sous vide chuck roast tastes just like prime rib, but at a fraction of the cost! It turns a tough cut into the melt-in-your-mouth tender meat. It’s like magic, and you got to try it!
Equipment For Sous Vide Chuck Roast
- Sous Vide Precision Cooker
- Vacuum Sealer and Sous Vide Bags / or Zip-loc bags
- Sous Vide Container Lid / or Aluminum Foil: To prevent water from evaporating during sous vide
- Sous Vide Container or a Large Pot
Ingredients You’ll Need
- Chuck Roast: Our top pick is a boneless beef chuck roast, which is from the shoulder of the cow with outstanding marbling. You can also use rump roast or bottom round roast.
- Olive Oil: Regular olive oil works great for this recipe.
- Garlic Powder: It adds complexity and deep rich flavor. You can also use minced fresh garlic.
- Rosemary: Adds a smoky, flavorful boost to the seasoning. I used fresh rosemary and chopped it into small pieces, but you can use dried ones.
- Sugar: You can use granulated or brown sugar.
- Salt: I used Kosher salt, but you can use regular salt or sea salt.
- Pepper: Freshly ground black pepper works best.
- For the gravy: You’ll need cornstarch, water, salt, and pepper.
How To Make Sous Vide Chuck Roast With Step-By-Step Photos
Sous vide pot roast is really easy: it takes just a few minutes to season and seal the meat, and then the sous vide machine will do most of the work!
Step 1: Make chuck roast seasoning
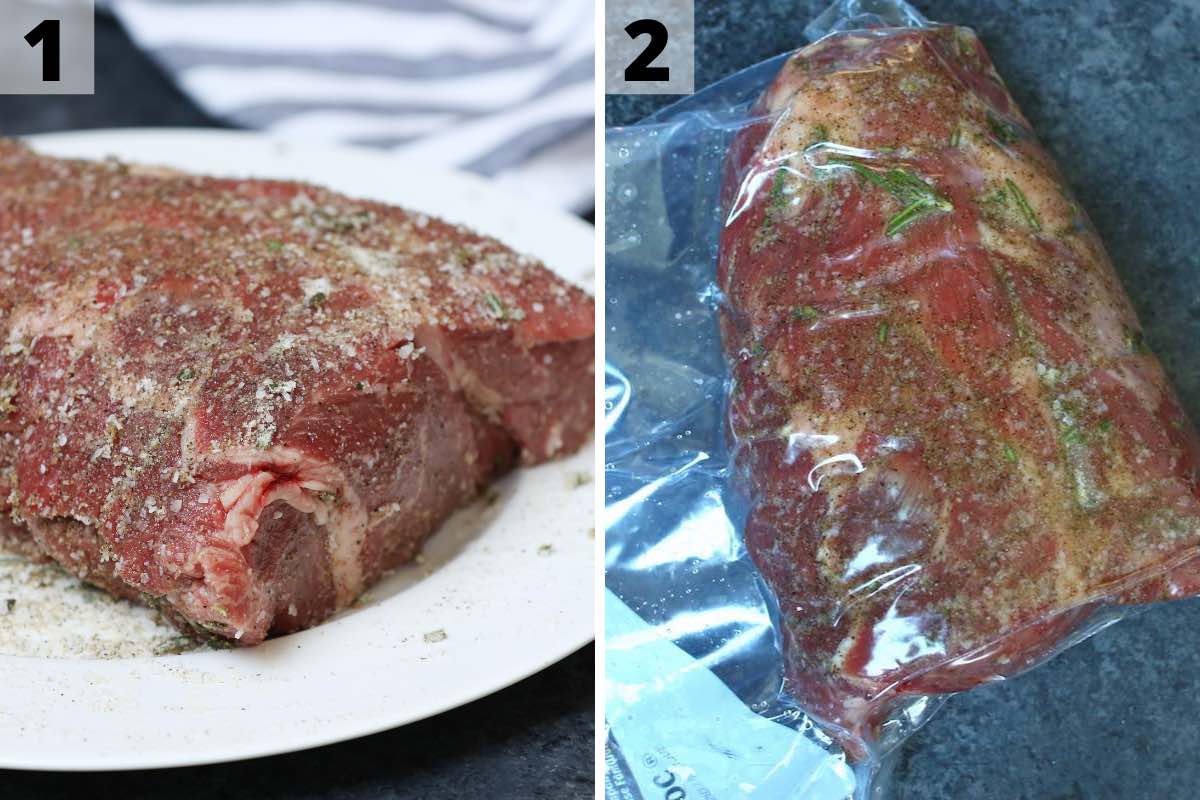
I like simple seasoning with salt, pepper, garlic powder, sugar, and rosemary. Rub the olive oil and the seasoning mixture all around your roast. The key is to season generously to bring out the best flavor of your roast.
Step 2: Vacuum seal the roast
Vacuum seal the seasoned meat with a vacuum sealer or zip-loc bag (with the water displacement method).
Step 3: Place the roast in the water bath
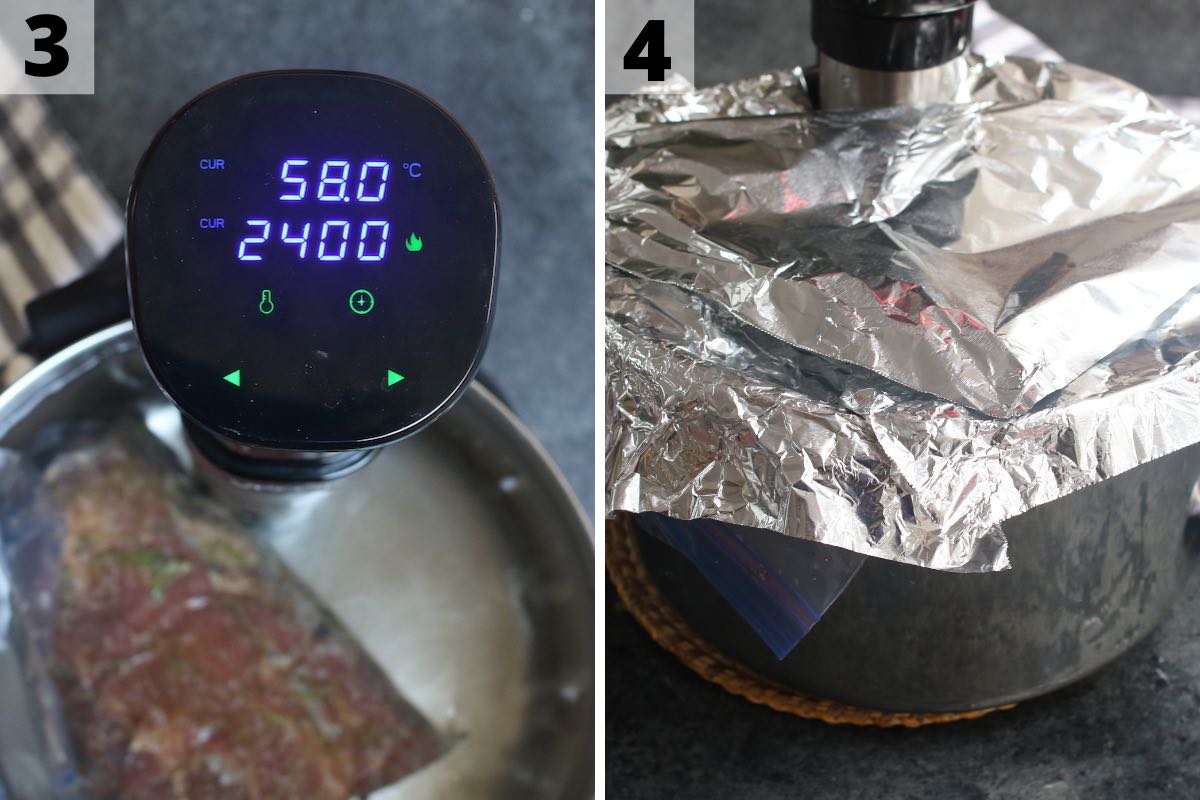
Place the vacuum-sealed bag in the sous vide warm water bath.
Step 4: Sou vide cook the roast
Cover the pot with aluminum foil and cook at 136 °F (58°C) for 24 hours. (The aluminum foil will minimize water evaporation.)
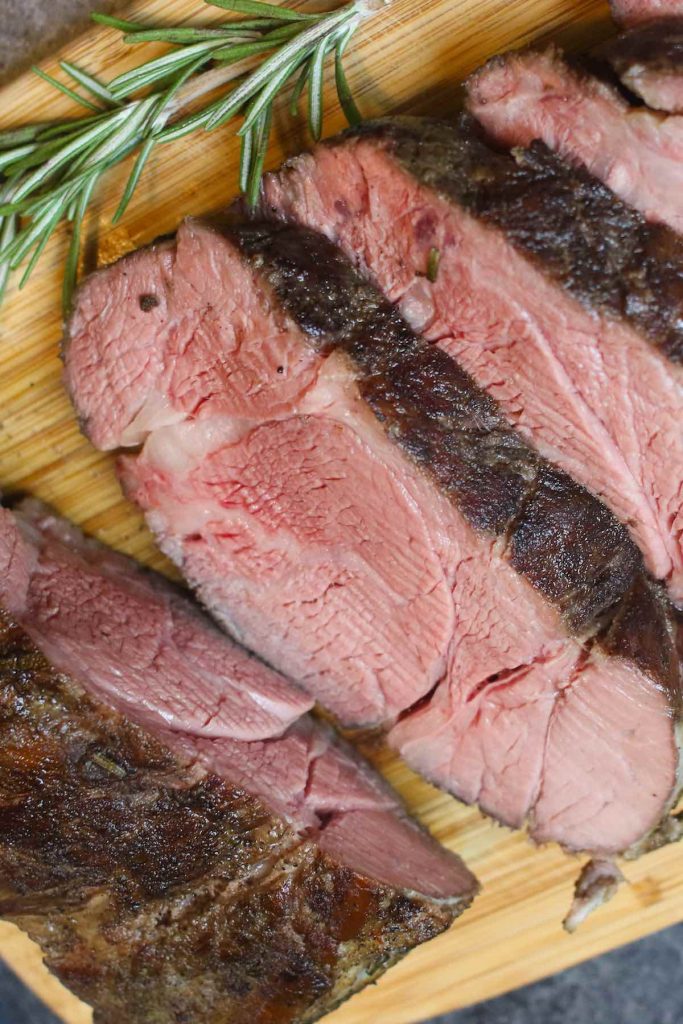
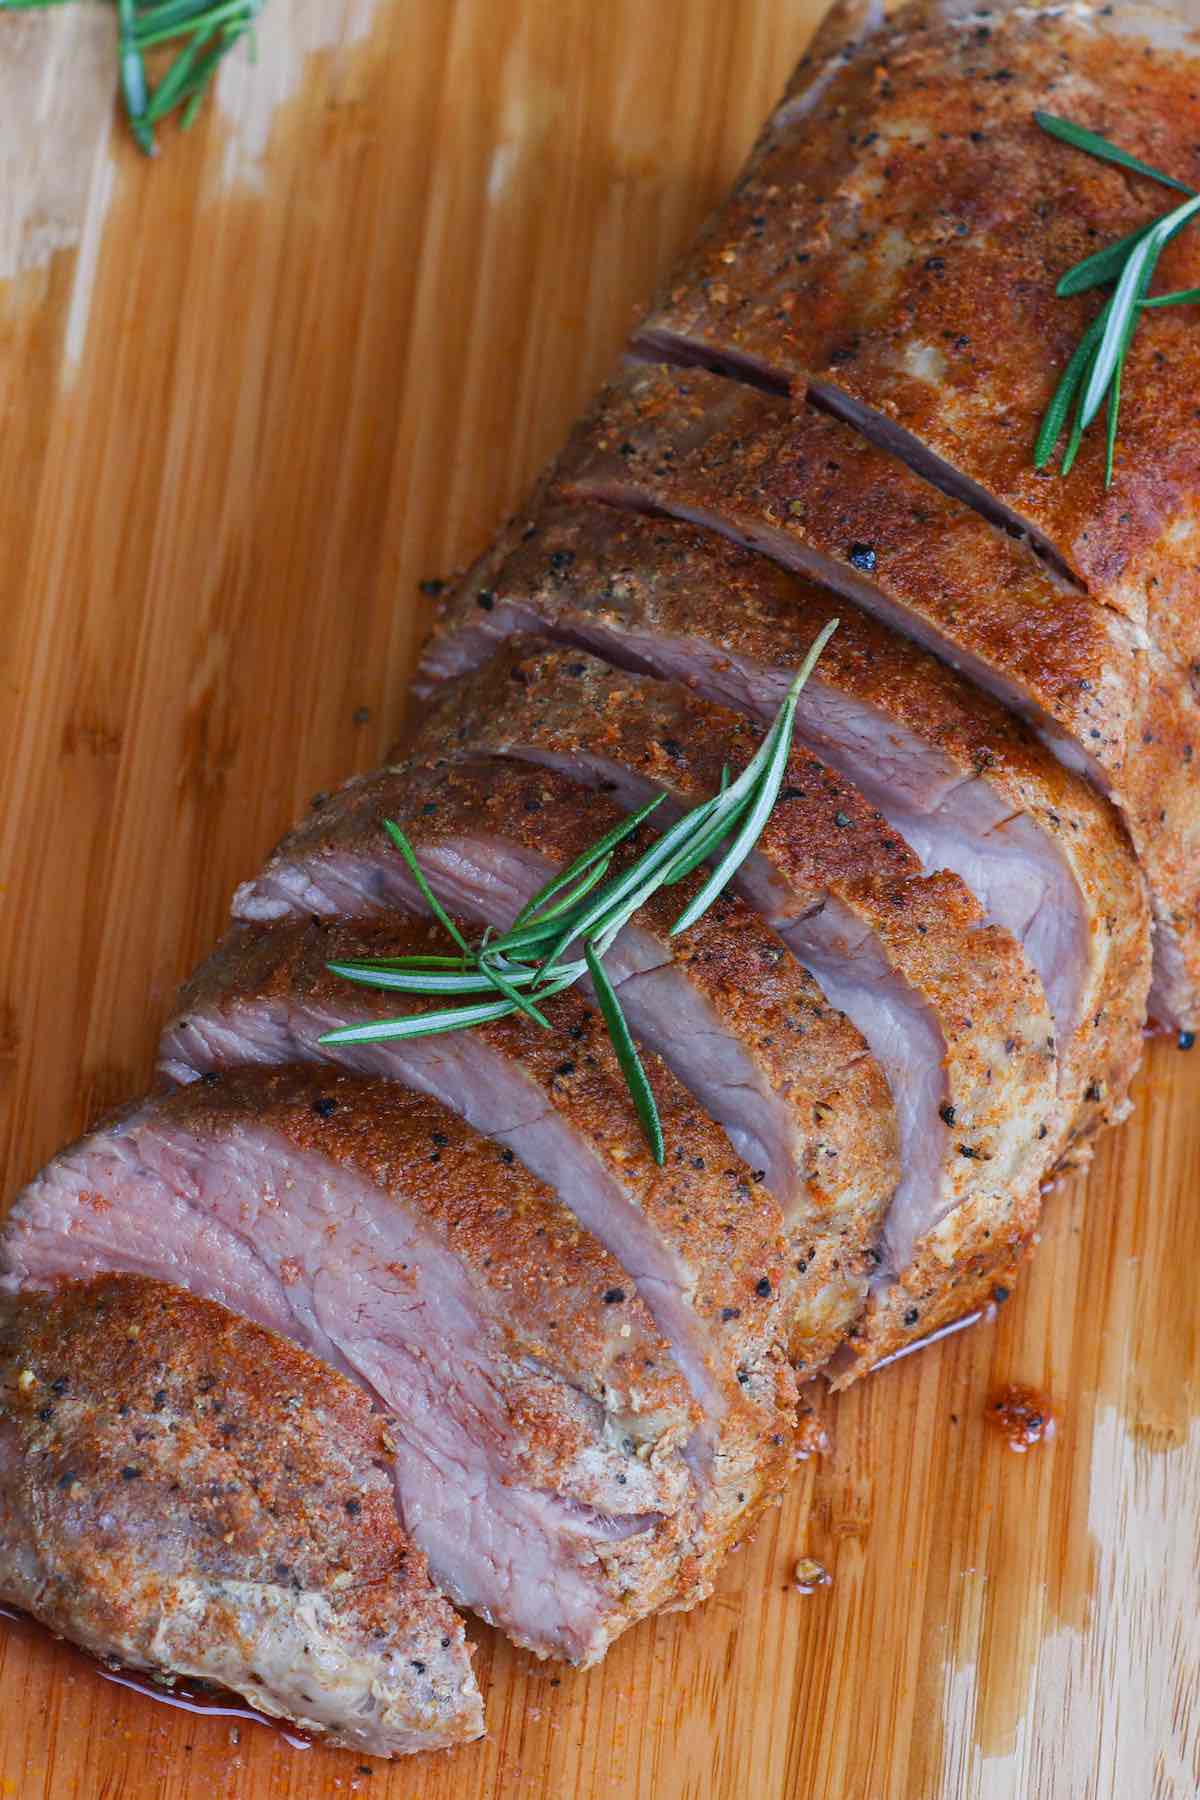
Step 5: Finish with a quick sear
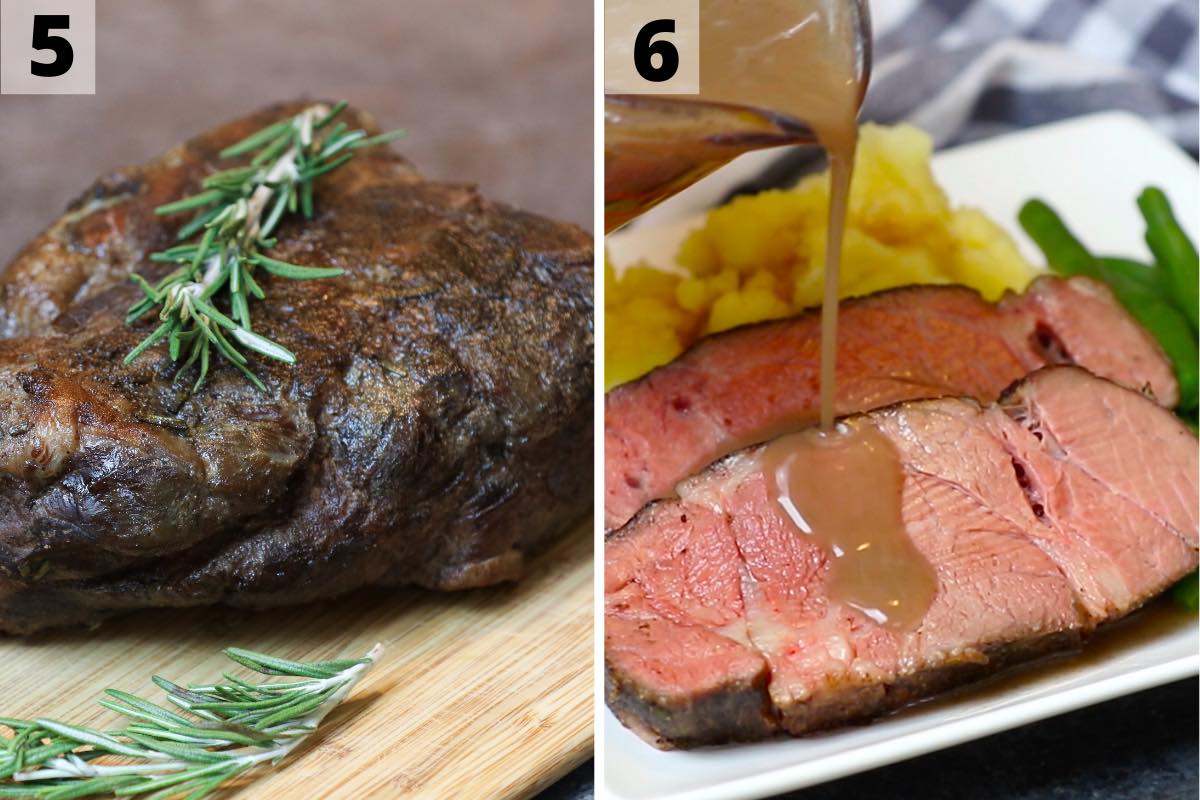
Remove the roast from the bag, and pat dry with paper towels. Add the roast to a hot skillet, quickly crisping the outside for about 1 minute per side.
Step 6: Make the gravy and serve
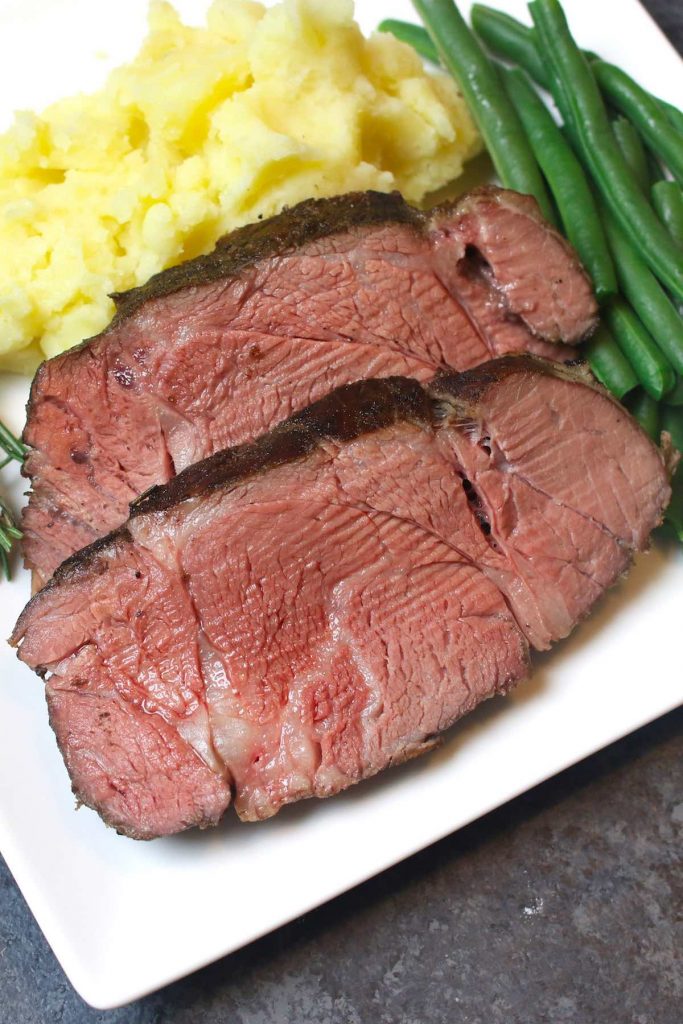
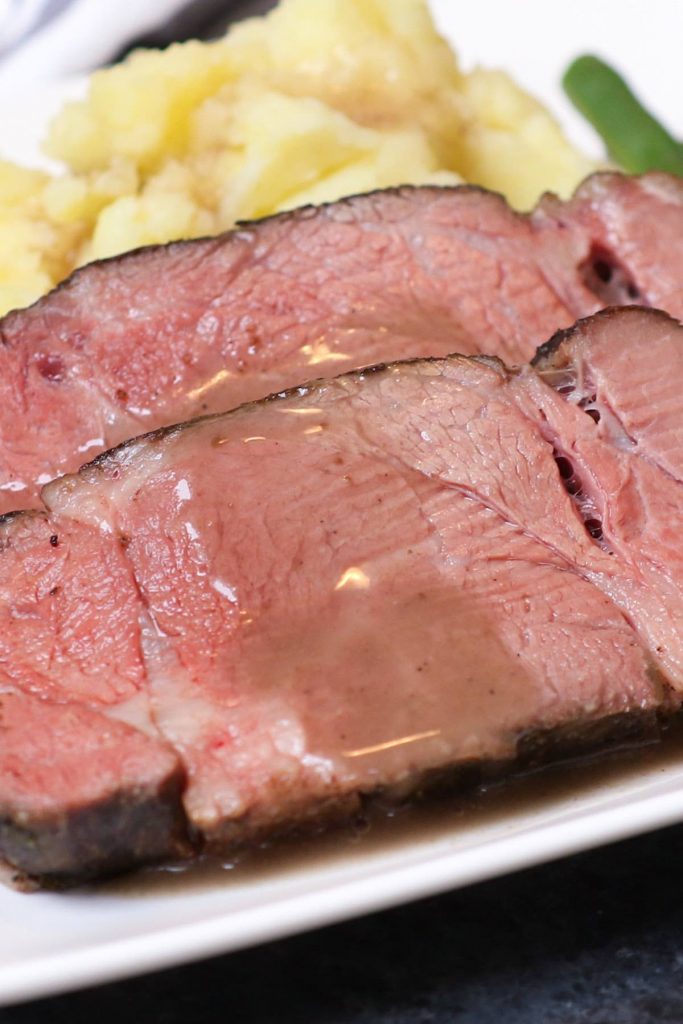
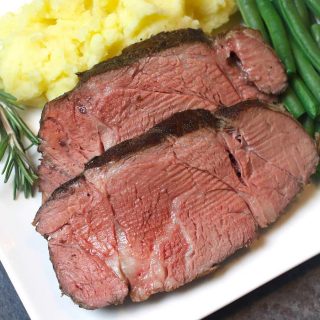
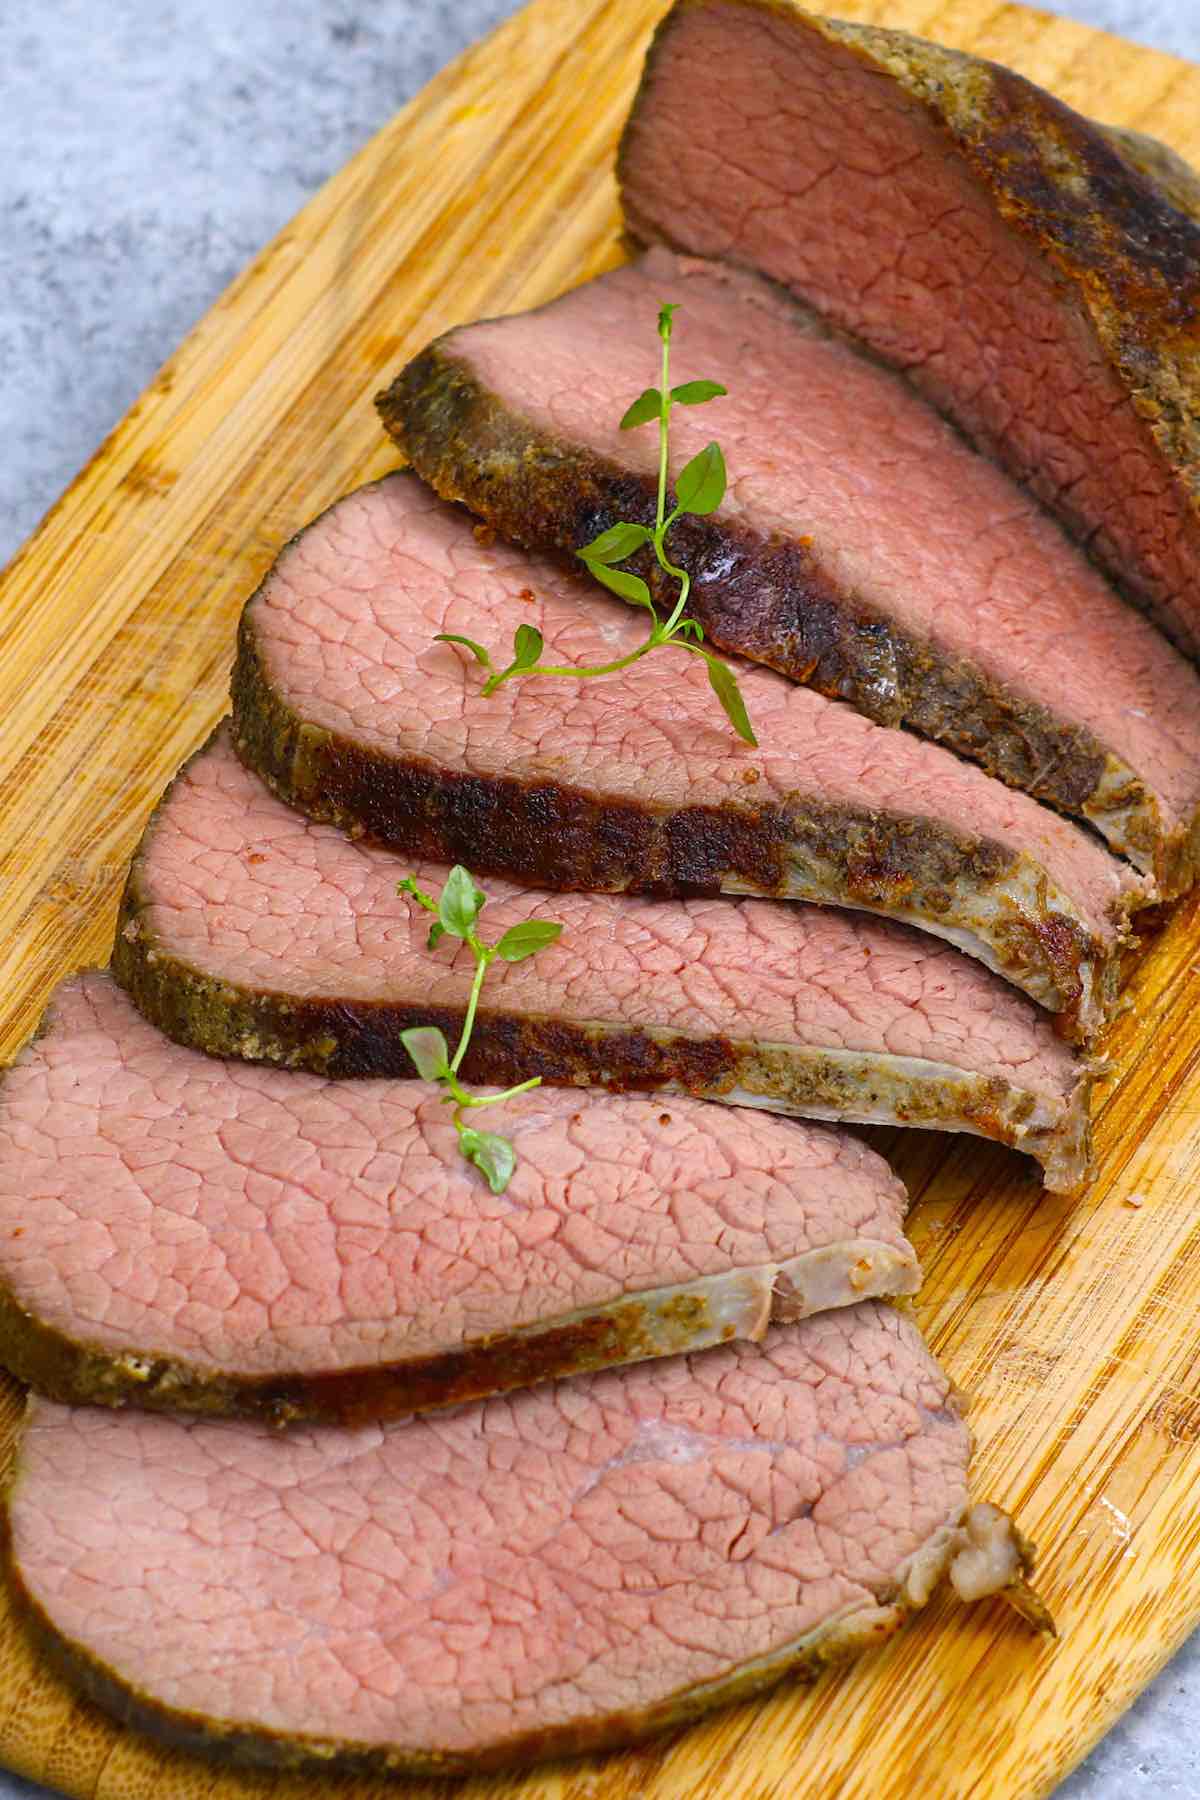
Pour the juices into a skillet, and add cornstarch slurry (mix of cornstarch and water), salt, and pepper. Simmer for about 5 minutes to thicken the juice into a delicious gravy. Slice the roast against the grain and drizzle with the gravy.
Pro Tips
- What kind of roast should I buy? For this recipe, my favorite cut is beef chuck roast. Other popular choices include shoulder roast, round roast, rump roast, and briskets.
- How to seal a bag without a vacuum sealer? If you don’t have a vacuum sealer you can use a zip-loc bag which is safe for sous vide cooking. The trick to vacuum-seal the bag is called the “water displacement method”: just place the seasoned chuck roast in the bag, and seal all but one corner of the bag. Slowly place it in the water bath, and make sure everything below the zip-line is covered by water. Then seal the rest of the bag.
- Check the water level from time to time, and add more water if necessary.
Note that you’ll need to cook the meat in the water bath for a long time. To avoid the seams of the zip-lock bag from popping open, make sure the seams are above water during cooking while the meat is completely submerged in the water.
Temperature For Sous Vide Chuck Roast
To make sous vide pot roast taste like a prime rib, we cook it to 136 °F (58°C) for medium-rare. If you prefer to have the same texture as the traditional fall-apart roast that you can shred, set the temperature to 170ºF (76ºC). For different levels of doneness, follow the chart below:
| Sous Vide Chuck Roast Temperature | Doneness |
| 125 °F / 52 °C | Rare |
| 136 °F / 58 °C | Medium-rare |
| 145 °F / 63 °C | Medium |
| 160 °F / 71 °C+ | Well-done |
Time To Sous Vide Chuck Roast
Chuck roast is a tough cut that requires a long cooking time. I cooked mine for 24 hours, but you can cook yours anywhere between 20 to 30 hours. If you cook your chuck roast from frozen, the cooking time is the same.
Gravy Adds Great Flavor To The Roast
Don’t throw away the flavorful juices that come out from the meat! We can turn them into the most delicious gravy that you can drizzle over everything.
To make the gravy, place a skillet on medium-high heat, and pour the juices and browned drippings into the skillet. When it’s bubbly, add the mixture of 1 tablespoon of cornstarch and 2 tablespoons of water on top, and stir frequently. Simmer for about 5 minutes or until the gravy is thickened. Season with salt, and pepper to taste if necessary.
This gravy is the finishing touch that pulls everything all together. It completely takes your pot roast to the next level!
Dipping Sauce For Sous Vide Roast Beef
A delicious dipping sauce will take your chuck roast to a new level! Some of our favorites are cilantro chimichurri, Arby’s Horsey Sauce, and Seafood Boil Sauce.
How To Serve Sous Vide Chuck Roast?
Using a sharp carving knife, slice the roast across the grain for serving, making the slices about 1/2-inch to 3/4-inch thick. Serve with gravy. Some side dishes that I like to pair with include mashed potatoes, steamed broccoli and green beans.
Wine Pairing Suggestions For Sous Vide Chuck Roast
You can pair your sous vide chuck roast with either red or white wine. Here are some of my favorites:
- Red Wine: I like to pair my sous vide chuck roast with a bold red wine like Cabernet Sauvignon or Merlot.
- White Wine: If you like white wine, a Chardonnay complements the rich roast beef perfectly.
How To Reheat Leftover Sous Vide Chuck Roast
For the best result, we recommend reheating the leftover chuck roast in the sous vide warm water bath.
Heat up the water bath to the same temperature. If you reheat the 1-inch thin chuck roast slices, you’ll need to cook it for about 30 minutes. For thicker pieces, cook them for 1-3 hours until cooked through.
How To Store Leftover Chuck Roast
Let your roast beef cool down first. Then pat the roast dry with paper towels. Store it in an air-tight container or zip-loc bag in the refrigerator for up to 3 days.
You can also freeze it in the freezer for up to 3 months.
FAQs
Can I sous vide frozen chuck roast?
Yes! One of the great things about this recipe is that you can sous vide cook the roast from frozen directly. The instructions and cooking time are the same as the fresh chuck roast.
Shoulder roast vs chuck roast: what’s the difference?
They are similar cuts from different parts of the animal. Chuck roast is from the shoulder, while shoulder roast is from the forequarter. They have similar flavors and textures, and both are excellent choices for sous vide cooking.
Will chuck roast get more tender the longer you cook it?
Yes, chuck roast becomes more tender the longer it is cooked, as long as it’s within the range of cooking time. The long cooking times, 24 to 48 hours, allow the collagen and connective tissues to break down, resulting in a melt-in-your-mouth texture and rich flavor.
However, you should avoid leaving it in the bath for too long, as the meat can become mushy.
More Delicious Sous Vide Recipes
If you tried this recipe, let me know how your Sous Vide Chuck Roast turns out in the comments below!
Best Sous Vide Chuck Roast Recipe
Ingredients
For the Roast:
- 3 lbs chuck roast, or rump roast
- 1 ½ teaspoons kosher salt, or 1 teaspoon regular salt
- 1 ½ teaspoons fresh ground black pepper
- 2 teaspoons sugar
- 1 tablespoon garlic powder
- 2 teaspoons fresh rosemary, chopped
- 2 tablespoons olive oil, or softened unsalted butter
For the Gravy
- 1 tablespoon cornstarch
- 2 tablespoons water
- salt and pepper, to taste
Instructions
- Preheat the Sous Vide Machine: Add water to the sous vide container or a large pot; set the Sous Vide Precision Cooker to 136°F (58°C).
- Season the Roast: Rub the roast on all sides with 1 tablespoon of olive oil.
- In a small mixing bowl, whisk together garlic powder, chopped rosemary, sugar, salt, and pepper.
- Rub the roast on all sides with the seasoning mixture.
- Vacuum-seal the Roast: Vacuum seal it using “water displacement” technique: seal all but one corner of the bag. Slowly place it in the water bath, making sure everything below the zip-line is covered by water. Then seal the rest of the bag.
- Sous Vide Cook the Roast: Cook the chuck roast in the warm water bath for 24 hours. Arrange the bag so that meat is completely submerged in the water. If you use zip-lock bag, make sure the seam stays above the water.
- Cover with several pieces of aluminum foil, which will minimize water evaporation.
- When the timer goes off, remove the bag from the water bath. Don’t throw away the juices in the bag as we’ll use them to make the gravy.
- Sear the Roast: Remove the roast from the bag. Pat dry the surface thoroughly with paper towels. Place a skillet on medium-high, add 1 tablespoon of olive oil. Once hot, add the roast. Sear each side for about 1 minute or until nicely browned. Remove from the heat immediately.
Making the Gravy
- In a small bowl, whisk together cornstarch and water.
- Place a skillet on the stove on medium-high heat, and pour the juices and browned drippings to the skillet. When it’s bubbly, add the cornstarch mixture, and stir with a wire whisk. Simmer for about 5 minutes or until the gravy is thickened. Season with salt, pepper if necessary.
- Slice the roast against the grain using a sharp carving knife (making the slices about 1/2-inch to 3/4-inch thick). Serve with the gravy.
Notes
- This recipe produces a pot roast that tastes like a tender prime rib. If you prefer the traditional pot roast texture, set the temperature to 170ºF (76ºC).
- If your roast is frozen, you don’t need to thaw them ahead of time. The cooking time for the frozen roast is the same in the sous vide machine.
Nutrition
Nutrition information provided is an estimate only and will vary based on ingredient brands and cooking methods used.
This post may contain affiliate links. Please read my disclosure policy.
I made this with a 2.5 lb piece of chuck. My advice is to trust the timing and temperature. I would increase the salt just a bit for me; and since I don’t eat a lot of salt, I think my thoughts on this are valid. The meat was still very good! But seasoning is subjective. At 136 degrees, the meat will be tender and still be rare. I made a gravy by reducing the juices for about ten minutes and making a roux paste with flour and water, then built up to a nice sauce. I didn’t sear it, but it was still delicious! As a first-time sous vide machine user, this is a keeper recipe. Thanks!
This is truly a great recipe! Thank you for posting it!
I have done this twice so far, and its been great. Very tender, flavor packed, and not a bunch of junk cluttering up the natural flavor of the beef. Truly a winner!!
My son is not a fan of medium-rare, so I had to increase the temperature to cook at medium, which still turned out incredible. He also prefers high-end cuts of beef, but it was love at first taste for him with this, and even loved it reheated in the sous vide the second time around (I froze leftovers). By far, one of the best recipes I’ve discovered. Thank you so much for sharing!!!
All I can say is incredible! So mouth watering good.
I love your method, but I am curious if you have ever smoked your chuck on a pellet smoker 1st, then sous vide it with a hight heat finish like hot grill or cast iron?